Read time: 5 minutes
Em Lloyd (Year 4) and Vikram Thirupathirajan (Year 6) provide their advice on making the most of dissection lab sessions.
Anatomy can be a daunting subject. Not only is there a vast breadth of knowledge to learn (just look at the thickness of your Grey’s Anatomy for Students!), it can also be tricky to know how to make the most of your time in the dissection labs. In certain modules (Y2 MMB – we’re looking at you) you can have hours each week timetabled in the lab and it’s important that this time isn’t a waste for you.
One of the most effective ways to learn and remember anatomy is to be able to visualise it – anatomy dissections do just that. In addition to this, exams can include dissection images in your questions, so the more you engage, the more you’ll get out of it.
So, whether it’s your first time ever in the anatomy lab, or if you’re just looking to make the most of your next session, read on for our best advice on how to learn anatomy in the dissection room.
Set goals for each session
The dissection lab has an impressive variety of resources available for you to explore and learn from. This includes cadavers for group dissection, pro-sections, radiological images, models, and more. Some specific sessions will even have specialised equipment on offer that you can use to really apply your anatomical knowledge, such as endoscopes or ultrasound machines.
However, the huge range can be overwhelming as well as exciting. To help you stay focused and not feel lost, it’s a good idea to set goals for each session on what you want to learn and which resources you want to use. For example, “This session I will aim to dissect the anterior thoracic wall and look through some radiological images of the thorax”.
Each session is accompanied by a dissection guide on how to carry out the cadaveric dissection and which structures you should be able to identify. If you are unsure where to start with setting goals, begin by having a look at the dissection guide and decide on an aim for your cadaveric dissection. For example, “This session I will try to identify the structures of the brachial plexus.”
Failing to prepare = preparing to fail

To be in the best position when you walk into the anatomy lab, you need to have at least a basic idea of what you’re about to dissect. Even ten minutes of preparation will help you to make the most of your session. So, we would recommend that you aim to read up on the relevant pages of the anatomy textbook and review the corresponding lecture. This means you don’t waste any precious time in the dissection lab and are instead able to spend that time applying your new knowledge to the cadavers and pro-sections. Of course, there are only 24 hours in the day and we know that it can be tricky to find time between all of your pre-clinical lectures and other commitments. At a minimum, gain some familiarity with the names of the structures you will be dissecting in that session.
Learn the language
Practice using anatomical terminology, such as proximal, distal, superficial, deep, etc. You can apply this in everything you do, from interpreting images to talking through dissecting your cadaver with your group. By getting into the habit of using this fundamental terminology, it will become like second nature to you. And take it from two clinical year students – it will 100% help you when you get on the wards.
If you, like many of us, are someone who struggles to grasp new terminology immediately, make an active effort to learn it. Our best advice would be to bring a small notebook with you into the dissection lab so that you can make brief notes (technical tip: keep a separate pen to take to the dissection lab to avoid getting formaldehyde-laced pens and affecting your other note-taking) on any new content or terminology that you don’t understand. If you keep adding to your notes, it can act as a valuable revision resource that you can quickly review at the start of each dissection session.
Work together
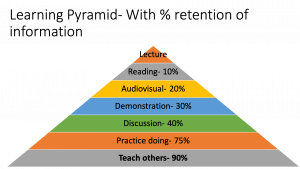
A great way to engage with your anatomy learning is to do it with someone else – whether that’s dissecting, or looking at pro-sections and models. Discussing things as you go encourages active rather than passive learning, and by working with a peer, you can quiz each other on specific structures and relations. Having a friend who you regularly work with also means that you can hold each other accountable for engaging with the session, and encourage one another when learning new topics.
As well as your peers, you have the opportunity to engage with the anatomy demonstrators and near-peer tutors, or ‘blue coats’. Be proactive – ask them for their best tips to learn, or ask them to explain something that you’re not sure about. If an anatomy demonstrator comes over to actively quiz you, don’t fear this. It can feel daunting to directly answer questions when you’re not sure, but engaging with this is a fantastic way to learn.
Don’t neglect pro-sections
The main focus of your anatomy laboratory sessions will obviously be the group dissection of your cadaver. However, it’s important to recognise that even with the most expert dissection, you won’t be able to identify everything. This is where pro-sections are invaluable to your learning – and there is a good chance that they will come up in your exams too. In particular, you should consider studying the pro-sections for your sessions on lung and heart anatomy, pelvis and posterior abdomen, skull base, and the pharynx.
We would recommend that you pay attention to the announcements from the lead anatomy demonstrator at the start of the session – they will let you know what resources are available for you to use. Make sure you set aside some time during the session to study the pro-sections that are available; ideally, bring a friend along with you to quiz one another.
We hope that you have found this article helpful and that you are able to put some of our advice into practice in your next dissection session.
 I enjoy writing helpful tips about how to make the most of your time at medical school. Being from Liverpool, London seemed intimidating and intense at first, but I’v
 I can’t quite believe I’m reaching the end of medical school, but I’m excited to share the experiences I’ve had along the way and tips I wish I knew to make the most of your time here. Despite being a Londoner for most of my life (I was born in Norway), I enjoy trying out new food places and playing badminton in my spare time.
 Despite having lived in five different parts of the world already, the last five years have still been a fresh and exciting mixture of ups and downs as I tried adapting (still am adapting in all honesty) to the university lifestyle. I’m excited to share some of my experiences with you in this guide and hopefully give you a few tips along the way. Outside of medicine I enjoy travelling, films, and most things coastal-side. Feel free to email any questions, concerns, or if you just want to have a chat.
