Mentimeter – minimising inappropriate use

Watch the video (6.30s) and / or read the guidance below.

Download / print alternative: Mentimeter_preempting_inappropriateuse


Mentimeter is a student response system that enables anyone presenting to a group (and this includes students) to invite interactions from the audience/ participants from simple social media icons (e.g. thumbs up/ down) through to a range of closed question formats all the way up to open questions and more complex data gathering tools. At UCL we use it for teaching, students are using it increasingly for their own presentations and data gathering and we also often use it as a tool to facilitate Continuous Module Dialogue (CMD). Whilst the response from both staff and students has been almost overwhelmingly positive there have been a few occurrences of infantile responses from some students when presented with open contribution formats and one or two occasions of very inappropriate use. This is of course completely unacceptable, and this post is designed to help you to know how to prevent it from occurring.

Mentimeter was chosen in part as a tool to benefit both staff and students as it is a means of increasing levels of engagement. The (mostly) anonymous contributions by participants is a key part of its engagement increasing appeal so is a boon though also offers potential for abuse when open questions are used without sufficient preparedness. Mentimeter offers 10 question formats, 2 quiz question formats and 9 slide types. Of these 3 question types are open text and one quiz is open text. For this reason my advice is to explore the potentials of the closed questions first! The following advice will also help you avoid attempts to subvert/ challenge/ cause mischief/ offend:

  1. Know your group and make a judgement about likelihood of abuse (from larking about to offensiveness; forewarned is forearmed). There do seem to be particular contexts where these sorts of behaviours might be more likely, such as where rapport has not yet built between students and lecturer. I’d urge colleagues to hope for the best but prepare for the worst the first few times. It is fair to say that as a broad principle you are more likely to witness inappropriate behaviour in a level 4 group you do not know than a level 6 group where you are working with your own tutees.
  2. First few live uses: only use closed options. There is a LOT more than multiple choice on offer and great value/ discussions can be built around the use of these question types. If you have any uncertainty, stick to these.
  3. Open text can layer on a lot though so I recommend couching first use with a warning delivered with just the right balance of smile and menace (!). My suggested wording:

What you say here is as if you stood on a chair and shouted it out loud. What amuses you could, potentially, lead to your expulsion and affect your career. Your ‘joke’ we have certainly heard before and, really, is it worth the risk? Also consider context of university versus, say, year 10 or 11 where you might expect such attention seeking behaviour.  Such abuses will likely lead to suspension of trust implicit in giving you the chance to voice your ideas and this impacts everyone.

  1. Use the profanity filter, but be aware of its limitations. A recent case reported to Mentimeter led to considerable work on their part to expand their English dictionary but, of course, to use a colleague’s excellent phrase: “creative fools” can find ways round this. There are many languages in the profanity filter but it is not exhaustive. Better to have it on than off. It is off by default.a two legged cartoon animal that looks like a cross between and sheep and a fish has a huge mouth and from its mouth comes a speech bubble with fake swearing in it
  2. Manage open-text contributions using the following two options:
    1. Word cloud and speech bubbles- blank main screen and monitor from the connected computer- close voting then hover/ click to delete inappropriate words or to have delete option on speech bubbles.
    2. Use the ‘Mentimote’ tool. This is a presentation tool that you access on a second device (e.g. laptop or smart phone). With it you can navigate slides (like a clicker), open and close voting and moderate comments.
    3. Alternatively, do not use word clouds or bubbles but use the Q&A and couple its use with Mentimote.


Digitally accessible learning design

Listen 5 mins 50 seconds or read below

This post accompanies a short presentation as part of the University of Kent Digital Education Webinar series by Martin Compton (UCL Arena) and the LTHEChat #251 (11/1/23) . In it are resources referred to in these events.  But please do read and try the linked activities for yourself even if you are not attending! The resource is designed to raise awareness of what digital accessibility means and what a ‘by design’ approach to digital accessibility requires us to know and to do. The session is also an opportunity for us to pilot aspects of an (in-development) Accessibility Engagement Tool with colleagues beyond the walls of UCL. The tool is being designed to help colleagues discuss their accessibility engagement and get clear direction on what they can do to further improve the accessibility of their teaching and, as far as possible in an anticipatory and planned way, rather than reactively or in response to a need that had not been anticipated. The goal is to enable colleagues to set some clear digital accessibility goals irrespective of their starting point.

Accessibility in its broadest sense is about making activities, environments, and information as useable and meaningful as possible in ways that do not exclude people. It is about empowerment, about minimising frustration and about effective anticipatory design. Digital accessibility therefore ‘provides ramps and lifts into information.’ It includes ensuring that all information we create at UCL can be seamlessly consumed by everyone that wishes to access it. As UCL’s digital accessibility policy is rolled out, we are using this framework so that we can help demystify aspects of digital accessibility

The accessibility engagement model and accompanying self-assessment tool are being designed to enable colleagues to plot their own level according to a series of questions about aspects of digital accessibility. The idea will be that through series of questions related to:

  1. Values and beliefs
  2. Knowledge and skills
  3. Actions and behaviours

…the tool will plot an overall position as well as noting areas of developmental or resourcing need. As we have shaped this model one area that has led to much discussion, consultation and head scratching are the labels we are appending to levels. As a starting point we propose six levels of ‘maturity status’ and invite colleagues to decide which level they are currently at:

Accessibility Engagement Model

Level Accessibility Maturity Status Characteristics and indicative practices
0 Unwilling Context means that this is not prioritised in current working environment given competing commitments and pressures.

Time is a key point of resistance.

1 Unable Don’t know where to start and/or in need of direction, support, and prioritisation.
2 Reluctant compliant Awareness of accessibility principles and drivers; only adopting bare minimum when encouraged.
3 Willing compliant Awareness of accessibility design principles; willingly adopting good basic level of accessibility.
4 Ally Connected to wider pedagogical values; allies are vocal on behalf of students. Role model or provide case studies/ templates for others in their departments.
5 Champion and Co-creator Activists/ innovators who work with students to understand and design more accessible approaches and resources. Potential contributors to institutional policy and strategy.

Digital accessibility behaviours

Whilst the questions and tool are still under construction, for now we invite colleagues to use the Mentimeter linked below to respond briefly to some ‘actions / behaviours’ statements.

Please access the Mentimeter so that you can (anonymously) assess your behaviours against a number of statements. For each statement you are able to choose from 0-5 as follows

0. Not on my radar

1. Would if I knew how

2. Rarely or if required

3. Sometimes

4. Always

5. Yes! And support others

The cumulative results (i.e. all those who respond) can be seen in the presentation slides which display results.

The statements in the slides can also be seen below.

  1. I use descriptive hyperlinks rather than ‘click here’ or unconcealed links
  2. I ensure that visual materials are conveyed effectively to those who cannot see them using alternative text descriptions and audio descriptions
  3. I ensure my documents are navigable with a structured set of headings
  4. I ensure tables are easy to read and have clear heading rows
  5. I enable automatic speech recognition captions in all multimedia
  6. I enable automatic speech recognition captions in all multimedia and make corrections to them
  7. I offer a range of formats for my materials e.g., PDF, html and docx
  8. I signpost students to assistive technologies so that they can have more support accessing materials
  9. I share electronic content with students (such as slides) ahead of teaching sessions
  10. I accessibility check my documents before finalising them
  11. I explain acronyms when I use them
  12. I check my work for colour contrast issues

Further resources

If colleagues wish to use the slides as they are then you will need a Mentimeter account. If you are logged into it you can then open the cumulative results slides and ‘copy to your account’ . If not, please do use the questions as framed and/ or await our proposed online tool.

Audio Feedback using UCL assessment platforms

We talk a lot about quality of feedback, about compassionate approaches to it and humanising this aspect of our interactions with students. We also hear a lot about growing workloads and the burden of marking. Audio feedback can be one way to tackle all these issues. I have written about my own efforts and action research in this domain and was delighted when Marieke Guy submitted this video for the Arena Bitesize video series on using UCL systems to generate audio feedback. Both the blog post and the video suggest some of the reasons why this might be a good idea and the video is an essential first stop for anyone at UCL wondering about the best way to get started.


For colleagues interested in the research evidence and more detail please see this UCL guide on audio feedback.

Colleagues may also like to read Samir Nuseibeh’s case study about using video feedback.

Moving assessment online- recommended resources

UCL resources shared by Marieke Guy

External resources

Team-Based Learning

29th March 10-11.30am

https://www.ucl.ac.uk/teaching-learning/events/2022/mar/talk-teaching-talk-tech-team-based-learning-tbl-f2f

Team-based Learning (TBL) is a learning and teaching approach that uses pre-session work, individual and small group work, and immediate feedback to engage students in the active learning process. It is useful for applying conceptual knowledge to an authentic and real-world problem.

In this session you will experience TBL as a student, completing a pre-session reading task (a short article on TBL) before working through the typical stages of TBL in a classroom setting. We will experience and consider the use of technology throughout the process and end by having time to discuss the application of TBL to you own context.

Session aims

  • Understand the stages of, and pedagogic rationale for a Team-based Learning (TBL) session
  • Consider how technology can be used to supplement traditional paper-based approaches to TBL
  • Discuss how to design TBL sessions, and demonstrate resources to support design and development
  • Reflect on how to apply TBL to knowledge and student learning in your discipline

Moving Assessment online

17th March 2022 10.30-12 Live event (UCL Staff)

Details and booking https://www.ucl.ac.uk/teaching-learning/events/2022/mar/talk-teaching-talk-tech-moving-assessment-online-f2f

The move to digital assessment, which has been slowly taking hold across the HE sector for some time, underwent a rapid and wholesale acceleration due to the pandemic.
•    What have you learned in the last two years about your students, your peers and yourselves and how has this impacted on your assessment and feedback practice?
•    How well do you think your assessment practices help prepare graduates to flourish in a changing and uncertain world ?
•    What opportunities and/or challenges have you encountered in the move to digital assessment?

We invite you to take some time out to take stock of where things are, to share experience with colleagues and engage in some creative problem solving. Here are some ideas to start with (feel free to bring your own!). We’ll ask you to take a vote on your top topics for discussion:
•    Making assessment authentic and relevant
•    Impact on the awarding gap
•    Marking workload (assessing large cohorts)
•    Collusion and contract cheating
•    ungrading (or giving grades)
•    ensuring formative assessment is effective
•    assessment literacy
•    PSRBs and regulatory requirements

Mobile phones 5: QR codes and short URLs

If we want students to access content on mobiles then shortened URLs and/ or QR (‘quick response’) codes are our friends. These are the discussion questions I posed:

What are they for? How do you use/ engage with them in personal and professional capacities? How do/ could you use them for teaching, learning and assessment?

QR codes can give quick access to media content, to a Mentimeter poll or to additional information or activites to prepare for a session. They can be used to answer FAQs (this works especially well in labs) or to provide anticipatory support or additional instructions/guidance.

You can create either on a mobile but I recommend doing this side of things on a lap or desktop.

QR code for twitter user

1. Twitter users only- a twitter handle in QR form

QR code holding text

QR code with text that could be accessbile via printed worksheet or display


QR code linking to photo album

Photo album in Google images accessed via single link


There’s plenty of ‘how to’ guidance available online. I tend to use tiny.cc or tinyurl.com for URL shortening as it’s easy to define my own URLs and for QR code options you might like to try  https://www.qrstuff.com/  or https://www.qr-code-generator.com/ (sign up) which are ‘freemium’ sites but do offer a lot for free.


Mobile phones 4: Audio

The apps you use and approach you take will depend on:

  1. The phone you have
  2. What you want to achieve
  3. The existing wider suite of tools you use

The following audio I recorded on an app on my phone that I chose because I have used ‘Dropbox’ cloud storage for years and this integrates really well. It’s ‘press the big red button’ thing where I talk then once I stop the recording it automatically uploads to Dropbox for ease of sharing. The dropbox version is here but I have embedded it below for ease of access.

  1. Do you want to generate an MP3 (i.e. most portable/ transferable audio file) or actually add to a podcast app? (if the latter and you are new to this try Anchor app via anchor.fm. Listen to this one http://tiny.cc/mcaudio2
  2. To record voice and convert to MP3 choose a voice recorder – there are tons of Android apps to achieve this http://tiny.cc/androidaudio – likewise in Iphone App Store

Mobile phones 3: selfie videos

Mobile phone footage might be sniffed at by marketing departments but there is an immediacy, convenience  and humanising aspect to reversing your camera, addressing a topic or targetted individuals or groups of students and recording a message. There are a few things that can cut the rought edges off such an ‘edupunk’ approach and finding ways to get the footage from phone to shareable online space (WITH captions) does need thinking about and perhaps a little practice and guidance the first time. Below I set out a few bits of advice: (note: I am NOT a film-maker or in any way an expert on these things but the following is based on my own development and exposeure to folk who are expert- special thanks to former colleague Dr Jodi Nelson-Tabor on this front). 


  1. Know why you are recording a video! This sounds obvious but there are a few questions that may need answering first: is there a more efficient way of communicating this? Why is video better than, say, audio or an e mail?
  2. ‘Edupunk’ philosophy humanises and is very forgiving! Most people I speak to hate seeing themselves on video and worry about faltering, coughing or things not being perfect. A ‘rough at the edges’ approach actually respects the virtues of this and can help us to embrace the flaws. It is in some ways a ‘warts and all’ approach that strengthens bonds between academnic staff and students. One way to show compassion is to show your humanity.
  3. Know where and how to get video off the phone and somewhere useful- short vids can be WhatsApp or other social media (not Facebook) or attached to e-mails to self. Better is to use cloud storage or YouTube account. You can also upload directly to Media Central (UCL’s video hosting platform) but record first to your phone. I use YouTube because it auto-generates pretty accurate and easily editable captions and if I want to upload to UCL’s video hosting site I can generate .vtt (caption) files easily.
  4. Make sure you have storage space and full battery on your phone.
  5. Switch on ‘Airplane mode’ to avoid calls mid filming.
  6. If indoors record, if possible, when there is minimal background noise. Mobile mics are omni-directional meaning they pick up everything.
  7. If outside wind is likely to impact audio so try it first and listen back before spendfing too much time recording. There are, of course mics and methods to ameliortate this but we’re focussing on being punks here not film-makers with expensive kit!
  8. Filming yourself and without help often uses lower quality ‘reverse’ camera. Selfie cam likely uses a different mic too. Test this as it is in a position that can get very dusty and grubby (on Iphones at least it is where your ear goes when you make a call)
  9. Stabilise! Even if it means propping camera somewhere. This is one investment consideration you may want to make if you are likely to do this sort of thing often. The goal is to not have a shaky camera or one where you are looking down which means your audience is looking up your nose!
  10. The camera is not on the screen- it’s hard not to look at yourself! Have practice addressing the camera rather than yourself and see how it changes the ‘connection’.
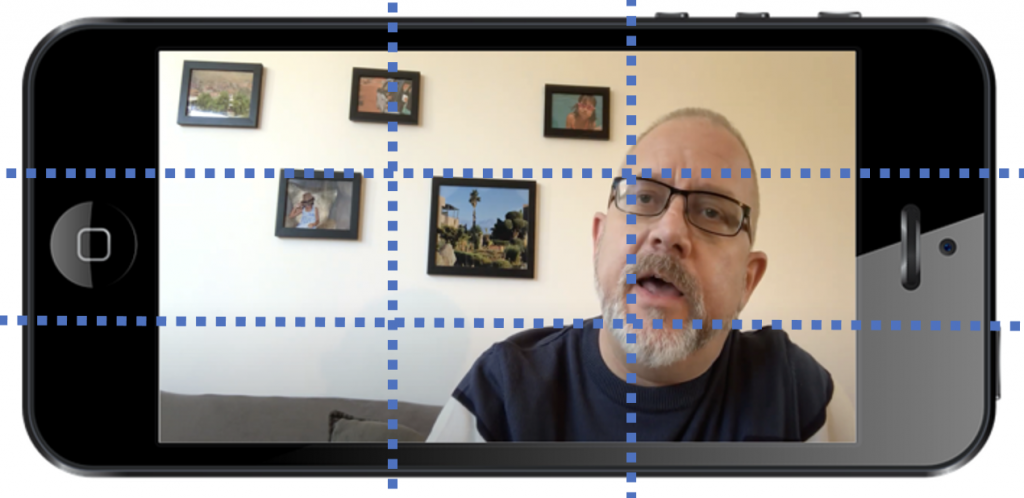
  11. Enable ‘grid’ on camera, consider framing and especially rule of thirds.

    Mobile phone with still from video shown

    ‘rule of thirds’: intersections are focal points

  12. Consider lighting. Again, we don’t need pro lights but if the light source is behind you you will likely be in shadow. if it’s too strong to one side it will give an odd effect.

The first three videos below are of me illustrating some of these points (or trying to!) The final one is someone else’s that brillianty explains the rule of thirds in the kind of non-technical way folk like me can understand!

  1. Vid 1- what’s wrong here?
  2. Vid 2- better but…
  3. Vid 3- good enough!
  4. Rule of thirds