What are Customisers?
The customizer is designed to make it easier for you to customize your theme and see the results in real time. It allows you to customise any theme before you activate it.
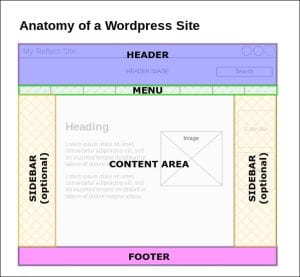
Depending on the theme you have chosen for your site, the following areas of your site will be customisable:

Header: This usually contains the site title and (optional) tagline. It may also contain a banner image and/or site search field.
Menu: Typically the menu sits below the header; however, some themes put the navigation into one of the Sidebars.
Sidebar(s): These are the areas to the left and right of the centre column. Sidebars can be used for navigation or for widgets.
Footer: Typically, the Footer contains such things as copyright information and terms and conditions.
Disclaimer: Not all themes support changes to the site identity, colours, headers, menus and/or widgets. If you do not see the relevant section in the Customiser, or do not notice any changes when you play around with the different functionalities, it might mean that the theme you have chosen does not allow for such customisation. Depending on the degree of importance of your customisation, it might be worth changing themes to explore the different looks your website can have.
Let’s start with the basics!
Watch the video below for a brief overview on how to customise your website:
Can’t view the video? Click here for the direct link: https://youtu.be/lcVxsc53Kh8 (opens in a new tab)
When building your blog, you will normally use the following functionalities within the customiser:
- Site identity: This is the setting used to change your site title and optional tagline on your blog. Not all themes display taglines, which are used to describe the purpose of your blog further. The site title and tagline are normally displayed in or near the header area of your site. The site title is also used when visitors bookmark your site in their web browser, so make sure it is short and identifiable to the image you want to project on your website.
- Colours: The colours setting controls the colour of the header text and background colour to customise your identity and brand. Not all themes allow you to change the header text colour, so options included vary depending, which can be more or less limiting. Changes to the header text colour can take time and you may need to wait for the page to refresh to view the modifications. Make sure that the colour contrast between the colours of your header text and colour for fonts has enough contrast to make it easy to read.
- Headers: The header image allows you to upload your own custom header image and/or a select a default header image from the image gallery. This allows you to personalise your website and add a logo, or header image to represent your identity.
- Background Image: Many themes allow you to add a customised background image to your website. When it is the case, it will appear behind the boxes for your content, widgets and sidebars. The image will appear behind the content you will write in the main area.
- Menus: Menus are the collection of pages you want to have on the main landing page of your website. This means that you can add your pages to the menu automatically (this can be de-activated), or have them “floating” your website, needing them to be linked to another page to access them. Most themes support custom menus which makes it easy to change the links displayed at the top of your site. Different menu formats exist, such as a horizontal line below your header, or a “sandwich menu”, which is more compact, and works as a drop-down menu. You can have menus with main pages, all their sub-pages will appear as a drop-down as well. Some themes allow for multiple menus to appear at the same time, but usually one is enough.
- Widgets: The term “widget” refers to any tool or content that you can add, arrange or remove from the sidebar(s) of your blog — these are the blocks that make up your sidebar. Those can be a calendar, a search bar, some text box to add content or information you wish to have on all your pages. To visit all widgets options and their functionalities, visit the ‘Edublogs Widget’ section of this website (opens in a new tab).
Visit the Edublog website for a full overview of what you can do with the customiser.
| Previous section |
